I am so delighted to have Casey from Casey's Elegant Musings with us today! She has been a favorite on my blogroll for sometime! I discovered her blog through Burdastyle (she's been featured on their frontpage a gazillion times) and couldn't help but be amazed by her creations, photography, layout, Casey is stunning!
Pistachio Green Dress above. Her style is all together 40s. It's amazing. Casey's blog is such eye candy to look at! She must be a skilled graphic designer as well because she puts together such a great look. I can't help but check it daily!
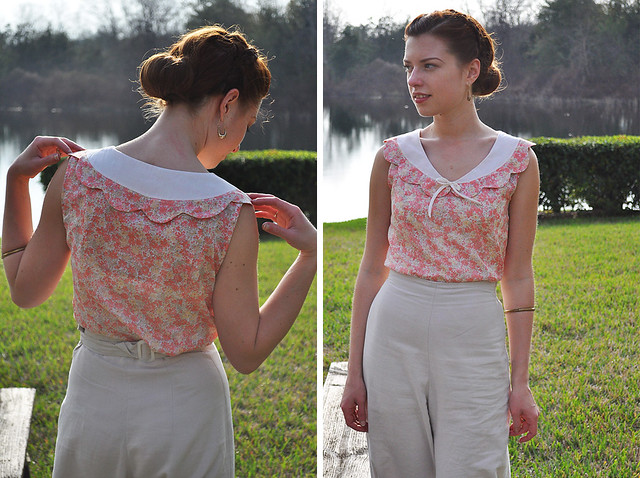
 1930s Linen high waisted trousers above. Says Casey, "Suffice to say, I’m a creative sort. I do a little of everything in my endless search for expression through the work of my hands. I sew, code web pages, knit, draw, decorate, thrift, design graphics, make collages, write. I love fashion (contemporary and past), fast cars, and design, sushi, photography, scuba diving, and music from classical chamber music to 1970s hard rock to contemporary indie bands. My interests are many, my time is in short supply, but I love to share them with my friends through this blog. "
One of her most gorgeous creations was made for a Navy Ball she and her husband attended. She affectionately refers to him as “Sailor Husband” on her blog. In fact her wedding was featured on Martha Stewart's blog! See the slideshow here. Seriously, lovely and unique!
Post Valentine's day dress above. I love that all of Casey's creations look well constructed! She says she has been sewing since she was very small and hasn't looked back since.
1930s Linen high waisted trousers above. Says Casey, "Suffice to say, I’m a creative sort. I do a little of everything in my endless search for expression through the work of my hands. I sew, code web pages, knit, draw, decorate, thrift, design graphics, make collages, write. I love fashion (contemporary and past), fast cars, and design, sushi, photography, scuba diving, and music from classical chamber music to 1970s hard rock to contemporary indie bands. My interests are many, my time is in short supply, but I love to share them with my friends through this blog. "
One of her most gorgeous creations was made for a Navy Ball she and her husband attended. She affectionately refers to him as “Sailor Husband” on her blog. In fact her wedding was featured on Martha Stewart's blog! See the slideshow here. Seriously, lovely and unique!
Post Valentine's day dress above. I love that all of Casey's creations look well constructed! She says she has been sewing since she was very small and hasn't looked back since.
I love all the detailing! You can definitely tell she puts a lot of time and effort into what she sews.
 Thank you Casey for sharing your lovely pattern with Grosgrain readers! It truly represents you as a sewer. I'm sure it will be a hit!
This is where I let Casey take the reigns......
~~~~~~~~~~~~~~~~~~~~~~~~~~~~~~~~~~~~~~~~~~~~~~~~~~~~~~~~~~~~~~~~~~~~~~~~~~~~
1920s Inspired Chemise Top
 An oldie, but goodie (I originally posted this 2009), I think! Especially since summer is right around the corner and lightweight tops become a must in many of our wardrobes. This top was inspired by a lovely antique in my collection. It’s a project that is easily done in a day (or less!); the techniques used include drafting a simple pattern, creating pin tucks, lace application, and a rolled hem. For my initial version of this reproduction, I used a simple polyester "bridal" lining I picked up at my fabric store, as the weight and opacity closely matched the original this was based on. China silk or a lightweight linen would be lovely options for material as well. For embellishment, the original sported a wide lace piece at the front, and narrower lace along the sides and back. In the spirit of this "mix and match" idea, you can certainly use lace motifs, pieces scrounged from lace yardage as a centerpiece and then supplement it with tape lace. For my version, I used a vintage tape lace that had a wave to it.
This tutorial is meant as a base for your project; variations and customizing is encouraged! (I have included a collage of images from my personal collection of 20s ephemera for ideas after the tutorial.) Try it in a soft print, skip the pin tucks, or maybe even try some lace insertion!
Materials List:
1-2 yds. lightweight material; polyester or rayon lining weight, lightweight silk, lightweight linen (please see introduction above)
Lace yardage and/or lace motifs (lace yardage should be a little more than the bust measure)
Ribbon to match fabric
Pattern drafting paper (I use banner paper from the office supply store)
Pencil, marker, ruler, scissors, tape measure
Thread, pins, fabric scissors, hand sewing needles
Sewing Machine
Drafting the pattern:
1. You will need to take the following measurements on yourself using a tape measure (or piece of string, if you don’t have a tape measure):
Bust (fullest measure over the breasts) + 1":
Over bust (measure above the breasts; generally this is only a 1"-2" difference) + 3/4":
Over bust to waist (from approximately where the top of the chemise would be, to the waist) + 6"-8":
Hip (fullest measure about 8"-9" below the waist) + 1":
 2. On the pattern paper, draw a rectangle that is 1/4 the hip width by the over bust to waist measure. On one of the long lines, label this "center front fold".
 3. Determine how many pin tucks you want and multiply by their width. For example: if you want 5 pin tucks in the center, and each is approximately 1/8" (from stitching line to fold), this would give you a number of 5/8". Double this number (since the pin tucks are folded) for 1 1/4". Add this number to the bust measure, plus an additional 1/2" of ease (if you have a small bust measure, you may be able to do a bit less than 1/2").
 4. At the top, measure from the center front line 1/4 of the bust measure (this gives a little extra room for the bust, and should generally account for enough ease for most). Connect the top line to the bottom (hip width) line at the side.
 5. Draw another rectangle as in step 2, only labeling one long line with "center back fold". At the top, measure from the center back fold 1/4 of the bust measure plus 1/8". Connect the top line to the bottom (hip width) line at the side.
 6. Add 1/2" seams to the sides and bottom of all pieces. Cut out pattern pieces, being sure to label with a grain line parallel to the center front and center back line, as well as the seam allowances and project name.
Constructing the top

1. Cut out the pattern pieces in your fabric. Do not mark the front pin tucks. Set aside the back piece for now.

 2. Begin with the pin tucks along the front section first. Lightly press a crease down the center front, creating a line. Measure 6" down the center front fold from the top; mark with a pin. Stitch a scant 1/16" to 1/8" from the fold to the pin. Do not back tack at the beginning or end of stitching. This tends to make lightweight fabrics ripple. Leave a tail at the beginning and end, using 2-3 overhand knots to secure the threads. Clip threads close to stitching. Lightly press to set the stitches.
 3. Measure 3/8" (or tuck spacing as indicated on your pattern) from the stitching line of the center front tuck. Mark with two pins, creating tiny pinholes (or leave in fabric for now). Lightly press a crease down the pin-marked line parallel to the center front pin tuck. (Remove pins if applicable.) Measure 5" from top edge. Stitch a scant 1/16" to 1/8" from the fold to pin. Lightly press to set the stitches.
 4. Repeat for 4" long pin tuck. Repeat 5" and 4" pin tucks for the other side of the center front tuck. Press.
 5. Take the back section, and match up right side seam of front and back, wrong sides together. Stitch 1/4" from edge. Press to set stitches and grade seam allowance. Now turn the seam to the inside, and press right sides together over the seam created. Stitch a scant 1/4" from edge, enclosing the first stitching line within the new seam (to create a French seam). Press to set stitches and press seam open.
 6. Open the length of the chemise and begin pinning the lace trim to the top edge, centering the top edge of the chemise in the middle of the lace (so half is overtop the fabric and half is off). Pin the length of lace in place along the entire top edge of the front and back pieces (or as is applicable with your lace design. If you’re using a central lace motif and tape lace on the remainder of the top, do the tape lace first and then the motif).
 7. With your sewing machine set to a narrow, small zigzag stitch, begin stitching along the bottom edge of lace (over the fabric) from the right side. Be sure to catch the lace and follow the contours of the lace, removing pins as you sew so as not to create rippling. Stitch along the entire top edge on the back and front; lightly pressing stitches to set after stitching.
 8. Using a small, sharp pair of scissors (regular size fabric shears are not recommended), carefully cut away the top edge of excess fabric above the zigzag line, leaving a narrow seam allowance. If your fabric tends to ravel, apply a small amount of a seam finish (such as Fray Check, or even white glue) to the fabric only.
 9. With wrong sides together of left side seam (the seam that was not sewn), stitch 1/4" from edge from the lace to bottom fabric edge. To prevent the lace from becoming tangled as it is sewn, place a piece of tissue paper (or other lightweight paper) underneath the lace to stitch over. This will provide a stable back for the feed to grip onto as the machine sews. After stitching, simply rip the paper away. Lightly press the seam to set stitches, and grade the seam allowance.
 10. Now turn the seam to the inside, and press right sides together over the seam created. Stitch a scant 1/4" from edge (using the tissue paper under the lace), enclosing the first stitching line within the new seam (to create a French seam). Press to set stitches and press seam open.
 11. Measure 4" out on either side of the center back, marking each point with a pin. Cut two pieces of ribbon, about 18"-20" long. Fold one end of each under and press. With the folded under edge towards the chemise, pin the ribbon to the inside of the top back edge, about 3/8" from the fabric edge. Repeat with other piece of ribbon at the other back point.
 12. Using a needle and thread, stitch the pinned edges of ribbon to the chemise, using back stitches for strength. You could also using a sewing machine, but the effect would be more noticeable.
 13. Measure 4 1/2" out on either side of the center front top edge, marking each point with a pin. Try on the chemise top (being careful of the pins!), and determine the length of the ribbon straps by pinning them over the mark. Remove top and trim ribbon ends, leaving 3/8" extra for turning under. Turn under ends and repeat attachment as for back ribbon straps.
 14. To hem the chemise blouse, you can do either a straight hem, turned up 1/4" and then 1/4" again (enclosing the raw edge in the fold), and stitched by machine. Or, for a fine finish typical of lingerie of this period, use a rolled hem (a great tutorial is here).
Thank you Casey for sharing your totally retro chic cami. I had a great time going through your archives and seeing all your past work!.
Stay tuned tomorrow for Liz of Say Yes! to Hoboken.
14. To hem the chemise blouse, you can do either a straight hem, turned up 1/4" and then 1/4" again (enclosing the raw edge in the fold), and stitched by machine. Or, for a fine finish typical of lingerie of this period, use a rolled hem (a great tutorial is here).
Thank you Casey for sharing your totally retro chic cami. I had a great time going through your archives and seeing all your past work!.
Stay tuned tomorrow for Liz of Say Yes! to Hoboken.
Spread the word! It's a 30 day Free for All!


 Thank you Casey for sharing your lovely pattern with Grosgrain readers! It truly represents you as a sewer. I'm sure it will be a hit!


 Like not spending money?
6 {comments}:
i can't wait to attempt this!! :)
Thank you for featuring Casey and her amazing works!! Can't wait to stitch this up!
I'm certainly going to bookmark this pattern. I've wanted a camisole with pintucks for a while!
I'd cheat by using on of my umpteen patterns as a template...I'm certain I've got something similar to what Casey's drafted...and heirloom embellishments are key. For those of with edge-joining foots, this is the time to use 'em! Think yards of yards of galloon-edged Cluny lace. Yummy. (Be sure to get that lace on sale, of course!)
Lovely! Thanks for sharing.
You made nice design and nice cloth selection. Making process is so nice. Thanks for providing these steps for us, there is a chance to we make it easy.
Yebhi Coupons
Post a Comment