skip to main |
skip to sidebar
1. Make the button loops. To do this take piece 8, the long small piece and cut it in half so you have two 6"ish sized rectangles. You can discard one of the strips.
2. Sew down the side of the strip. If you have a loop turner you can sew very close to the fold. If not sew as far apart to the fold as the size of a safety pin.
3. Trim the excess allowance.
4. If you have a loop turner thread it through the casing. Hook it to the end and pull it through so that the casing is right side out. If you don't have a loop turner, hook a safety pin through the side of one end and thread it through the casing, turning it right side out.
5. Cut into loops and sew it to the right side of your right bodice with the loop facing away from the straight edge. Sew them to the bodice according to the pattern.
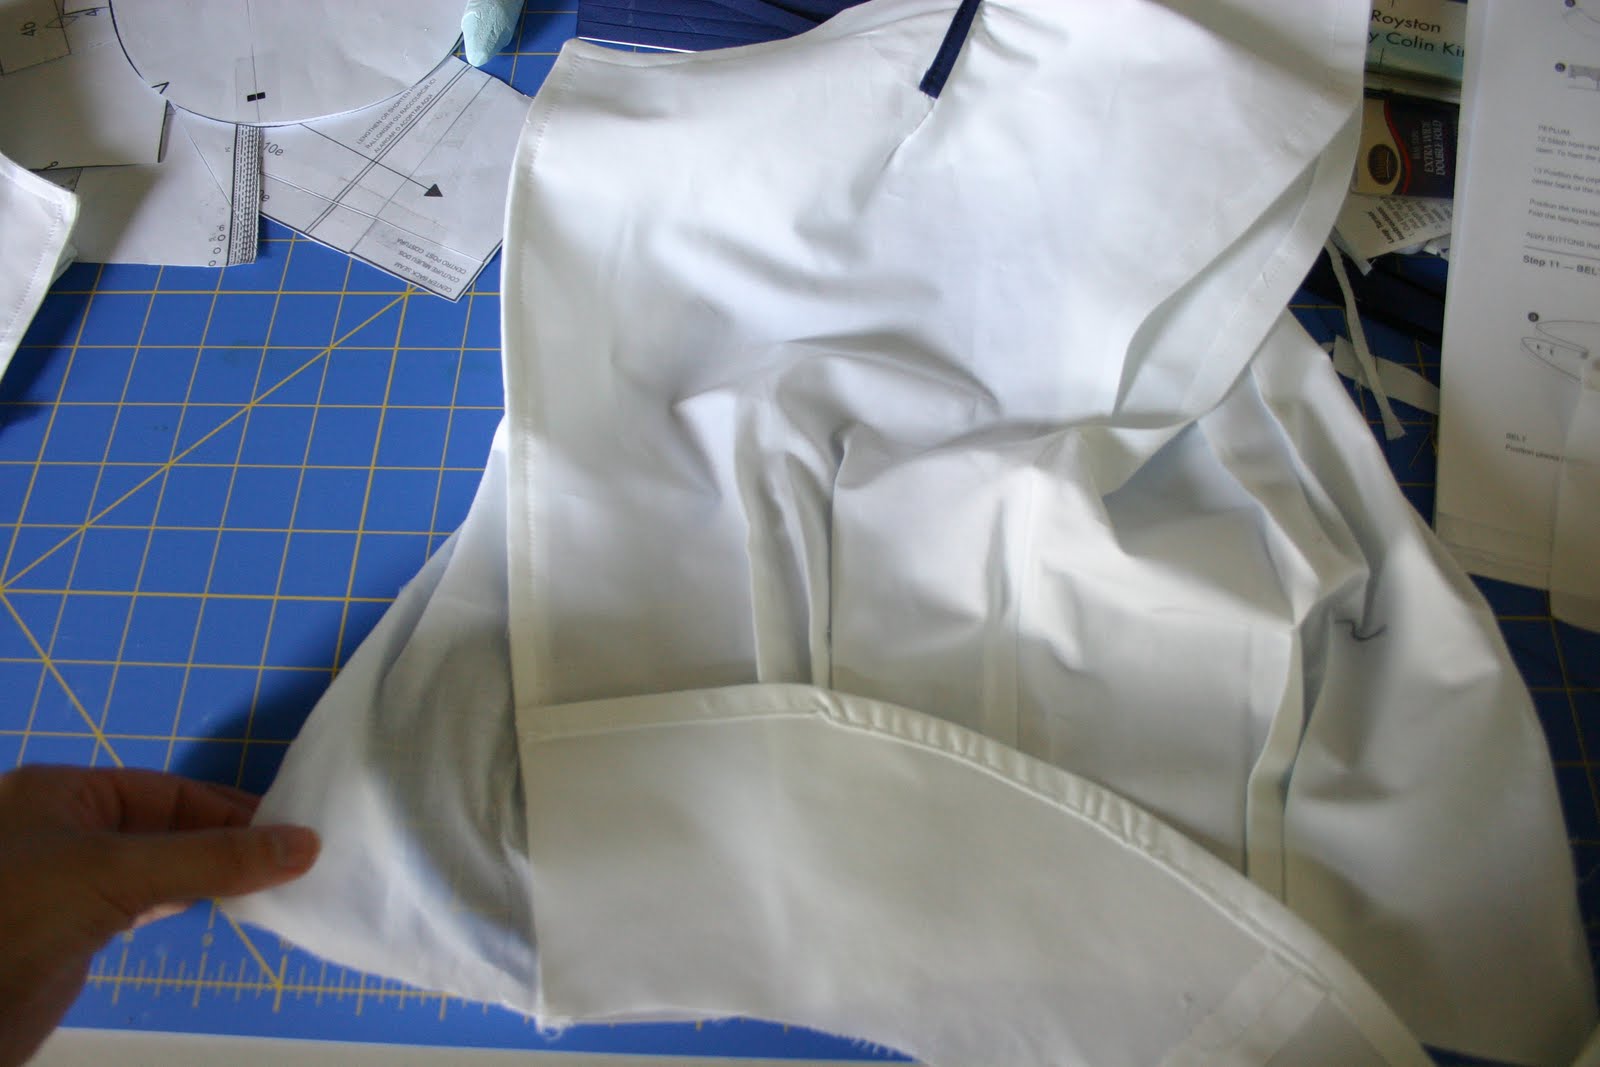
6. Sew the front bodice facings to the back bodice facings, right sides together at the shoulder seams.
7. Since we are making this into a dress rather than separates we will be sewing a zipper into the back, therefore we will not be sewing button loops and buttons into the back. So take your back facing and cut off the bottom as show in the pic to your left.
8. Sew facing to bodice front and bodice back, right sides together, doing your best to match shoulder seams.
9. Clip curves.
10. Turn right side out and iron flat.
11. Sew your side pieces to the back piece right sides together.
12. Iron a fold into the outside edge of the peplum, including the shorter edges.
13. Fold over again and sew down. Iron flat.
14. Pin the peplum to the bodice, right sides together with the hemmed seam up toward the neckline.
15. Take the bottom of the front bodice facing and turn it wrong side out so that it covers the peplum.
16. Sew across the bottom of the bodice catching the facing, the peplum and the bodice.
17. Since we are sewing in a zipper cut the back of the peplum where it ends at the back of the bodice.
18. Turn facing and peplum right side out and iron seams down. Repeat steps 14 to 18 for the other bodice side.
 19. Place your front bodice pieces side by side and mark where your button should be.
20. Sew in your buttons and hook onto button loops.
DONE FOR TODAY! If you have any questions please leave them in the comments and I will try to address them.
And the new FBF button is below. Feel free to link to the Frock by Friday to get more fun people involved! To grab the button just highlight it, copy and paste into a new post or sidebar.


 Like not spending money?
12 {comments}:
okay so...i finally got the burda part to print but no luck with the mccalls part and i need to catch up as i know that i may have a question and want to be sewing along while you are still reading the comments. have a chunk of time set aside tomorrow to work so can anyone help me with getting the mccalls pattern....can anyone just email it to me????
Jennifer, I can try to email the pdf, but I'm not sure if it will work. Every time I open it on my own computer it asks for my email and password. I can give it a try if you want to post up your email address.
Hi Jennifer
I've got the free dress pattern download from McCalls 5466 in size 12-14-16-18, I can email it to you - what's your email address (perhaps set-up a new one on hotmail so you don't get loads of spam as result of posting it on the web?)
:) Claire
Try using a crochet hook to turn the casing. Leave a long tail of thread on the seam and wrap it tightly around the hook end. Insert the other end into the casing and voila!
I'm a few days behind and have just gone to do the skirt and think I've completely got my sizing wrong. Can I just check that I should get the sizing from the McCalls website? http://mccallpattern.mccall.com/misses--miss-petite-pages-585.php Thanks
Mrs. Butters,
I just want to make sure than you are adding the pockets. Did you see this post?
http://grosgrainfabulous.blogspot.com/2010/08/frock-by-friday-tuesday-contattaching.html
Hi, yes I am but it still seems way too small. I based my sizing off the finished dress measurements which I'm now guessing is wrong!
kathleen is there any way that you can email me the mccalls pattern i have been spending forever trying to get it and having no luck at all sent you my email info the other night to that tumtum tree email address...please help!!!! thanks
anyone else who may have it in a small size would love some help that pattern is impossibile to get even my husband is trying from another computer at his office!!!
clare...is there a smaller size, not sure that one would work for me??? but i may just try to make it and i SOO APPPRECIATE YOUR HELP
Mrs. Butters,
I cut the skirt to the smallest size and it fit me well. I am a 26" waist. So according to the McCalls site, I should be a 10-12. So I don't know what to make of that.
What I would do is cut out the paper pattern to the size you think is right, pin the paper pattern pieces together, wrap it around your waist and see if it fits. If it doesn't, add a little or subtract a little.
Hope that helps.
Thanks Kathleen, I did that and the size fits me on the hips it's just too small at the waist. I've taken the pleats out and it will fit like this but do you think this will sit okay in the final dress?
mrsbutters,
I would try to make it a bit bigger so you can keep the pleats. Also, remember that it will close up in the back too making the skirt even skinnier. If you don't like pleats, what some people are doing is instead of making pleats they are making darts. And if you see FBF Friday I make darts in the back of the skirt instead of pleats. I explain how to do that in that post.
Post a Comment