


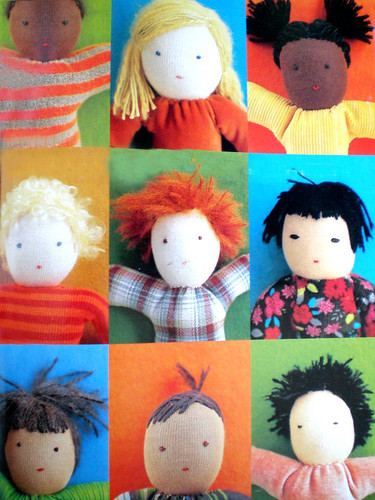
 Every year I try to give something both handmade and store bought. I give both because some people just like store bought items and that's okay too. But giving a handmade gift is also a gift to me because I love to impress others with my handiwork. Last year I gave these handmade dolls to Lily. I had wanted to make twelve, a unique one for each country, but somehow time got away from me and only made four.
I found the tutorial in a Martha Stewart Kids but when I went on their website there was no tutorial to be found....LIKE NONE. I really scoured and came up with squat. But I thought they were such smart, sweet idea that I decided to post it for you myself.
Molly likes to rub the African doll into her face. I think she likes her ponytails. This year, my friend Abi requested that I make one for her daughter Gracie. I thought a cute idea might be to make one that looks like her and then sew one that resembles Lily. I have this idea where they are happily playing make-believe with their respective dolls (quietly of course, it is a dream).

MATERIALS:
Doll template
10 x 18 inch piece of washable fabric (body)
10 x 10 inch piece of jersey knit cotton (skin: face, hands, feet)
matching thread
embroidery floss (for features: black, brown, blue, or green for eyes; shades of red or pink for mouth)
Yarn (for hair)
batting
scissors
straight pin
INSTRUCTIONS:
Choose the yarn for the hair with care; alpaca works for straight hair, and bouclé has built-in curls. For shorter curls, embroider mohair yarn directly to head and brush slightly.
 1. Use the template. Fold a 10-by-18-inch piece of washable fabric (for body) end to end, right sides facing; lay template on fabric with dotted lines of shoulders on fold, and cut out along solid lines; pin. From a nearly 10-inch square of cotton jersey (for skin), cut a 3-by-7-inch strip (for head) and four 2-inch squares (for hands and feet).
 2. Starting at bottom outer edge of one leg, stitch up side to end of arm, with a 1/4-inch seam allowance. Repeat on other side of body. Sew inner edges of the legs. Notch curves on body. Fold head rectangle in half lengthwise; pin. Starting at the fold, stitch a curved shape across short end, as shown, and continue stitching down open side; snip away excess fabric, keeping 1/8-inch seam allowance. Turn both pieces right side out.
 3. Cut three 2-by-7-inch strips of wool or polyester batting; lay in star shape, as shown. Roll more batting into a 2-inch ball; place on star. Bring strips up and around ball; use a chopstick and your fingers to push batting inside head. Head should be firm; add more batting if necessary, smoothing with fingers.
 4. Tie thread the same color as skin around head below ball to create a neck. Stitch bottom opening closed. For hands and feet, place 1-inch ball of batting on each square; bundle, tying with thread.
 5. Stuff body, but not as firmly as head. Use gathering stitch to tighten neck opening. Slip head into neck opening. With a doubled length of skin-colored thread, whipstitch head to body, folding under raw edge of body. Repeat for hands and feet.
 6. Use pins to mark placement of features. Sew on yarn (for hair) in loops; to keep it in place, make an extra, tiny anchoring stitch at the end of every loop. For features, insert a needle threaded with embroidery floss through the back of the head and out at a pin. Stitch features; needle should exit at the back of the head. Tie off.
 7. Snip loops of hair, and fluff. Use your fingers to shape the face.


 Like not spending money?
23 {comments}:
I saw these forever ago in her child or baby magazine and loved them...I wonder if I still have that magazine in my collection...
Thanks for posting this!
I love this.
I can do it without a sewing machine, which a great thing, since I struggle on the machine.
Must try.
The official Martha Stewart tutorial is here - http://tinyurl.com/6s86wv
Your daughter looks very sweet playing with her doll. :)
Very cute..
When my kids were little I always made a few handmade gifts...
I have made many dolls like this, if you search waldorf doll you will find many ideas and patterns...
Louise
I love the pigtails!
Ugh! two days too late. Check out the little elf doll I was forced to make when Walmart didn't have any and my kids were setting out crackers for a Christmas elf to appear! This would have been much cuter. Thanks!
THank you so much for posting this tutorial. I can't wait to make one for my neice!
Thanks for sharing! These dolls are adorable.
these dolls are adorable! where, with 2 little ones do you find not only the time to make all these cute dresses and dolls, but post pics and blog! You are amazing! such wonderful ideas you have
What a cute dolly! Thanks for sharing the tutorial...now if I can just get all this Christmas crafting done and actually START making my Christmas cards, I'd be in good shape :-) Yeah, I said Starting....I'm such a procrastinator, hehe!
Very cute, thanks for sharing. I'm working on the handmade gifts this year also. I wish I had some name fabric so I could make my mom her own gift bag... I might have to improvise.
What sweet dolls! What child wouldn't adore a doll that looked like her/him!
Love those, you smart girl!
Becky
what a lovely idea!
Thank you for the instructions to make one of these. I love dolls and will make one for my Chinese daughter, Maylin. I may make more too for the other babies in the orphanages in China. *hugs*
I love these! I am so excited to make some for my girl.
this is a great tutorial! i wanted to add one thought- i like to make my doll faces out of old t-shirts. my husband goes through so many white tees, it's nice to have something to do with them!
Thanks for the post! I know what 2 little girls are getting their stockings for Christmas!
Oh I love that idea! I am going to try--though I have little to no sewing skills! Thank you for the tutorial!!
I love these. I'm nervous but I'm gonna go for it.
Thanks for the excellent tutorial.
Nice collection
I really do think that you should credit your source. I think it was Family Fun Magazine that I clipped it out of. These were created by Brooke H. Reynolds and Silke Stoddard. I agree they are super cute!
Whoops, Jo is right. It was Martha - Family Fun has their name all over their magazine pages. I guess I wouldn't have been right on my source either, since I clipped the pages out several years ago too.
adorable!!
Post a Comment