


Please give a big welcome to Katy from No Big Dill.
(Today's featured pattern after intro.)
I found Katy after seeing her stylish Ruched Headband tutorial below. It was just such a great look that I had never seen before and upon further inspection I found that sentiment spoke to pretty much everything No Big Dill had to offer.

Katy's creations always have some really great 'WOW' factor.

Do you like fantastic photography with your sewing? Katy's got that.

Katy's quite a gal! Not only does she put together an amazing blog and finds the time to sew, but she is a mother to five adorable children with another on the way! All with fabulous names BTW, my favorite of which being her youngest, Clover.

Katy was kind enough to ask me to participate in her 'Once Upon A Thread' themed month in which guests made clothes and crafts based upon their favorite books. The idea was just so genius. Here was one of my favorites from that series.

You can tell that Katy's blog comes from a place where her love of sewing and love for her children combine. It's just such a lovely blog to visit everyday.

I love how Katy uses color in everything she creates. Her greens and oranges and yellows make me gasp.

I also love how she doesn't let the fact that she doesn't know Japanese to keep her from using Japanese pattern books. (Note to self, must try that sometime.) Her outcomes are always a treat!

Thank you Katy for taking the time out of what I can only imagine was a very busy day! I truly appreciate your hardwork AND of course today's adorable pattern.
Katy, take it away!
~~~~~~~~~~~~~~~~~~~~~~~~~~~~~~~~~~~~~~~~~~~~~~~~~~~~~~~~~~~~~~~~~~~~~~~~~~~~~~~~~~
So, it's a really big deal that I'm here today. With Kathleen's sense of style paired with her impeccable workmanship, her creations are always astounding. I love her eye for reinventing a piece she picks up at the second hand thrift shop. It is such a gift to see the potential in something and have the ability to bring that to fruition. So glad and definitely honored to be here today!
When Kathleen asked me to participate, I knew I wanted to share this Ruffled Clover Dress, which I actually drafted and created a year ago when I made all my girls coordinating dresses for Easter. My little Clover grew out of it too quickly, so this was the perfect chance to make another, plus do a tutorial!

The fabric I used was that 5yards/5 dollars you find on a piece of cardboard, very much like a cross between lining and taffeta=nothing fancy. I started by cutting about 3 1/2 yards of it in strips, 6" wide.

Sew all the strips together, press open seams and then fold entire piece in half lengthwise, pressing so edges are even with each other.

Gather entire strip. There are lots of ways you can do this, here are three option: I used a ruffling foot, you can also stitch two basting stitches along the edges and gather the fabric by pulling the threads from one side, or you can increase your thread tension and rest a couple of fingers on your top spool of thread, gathering as you go.

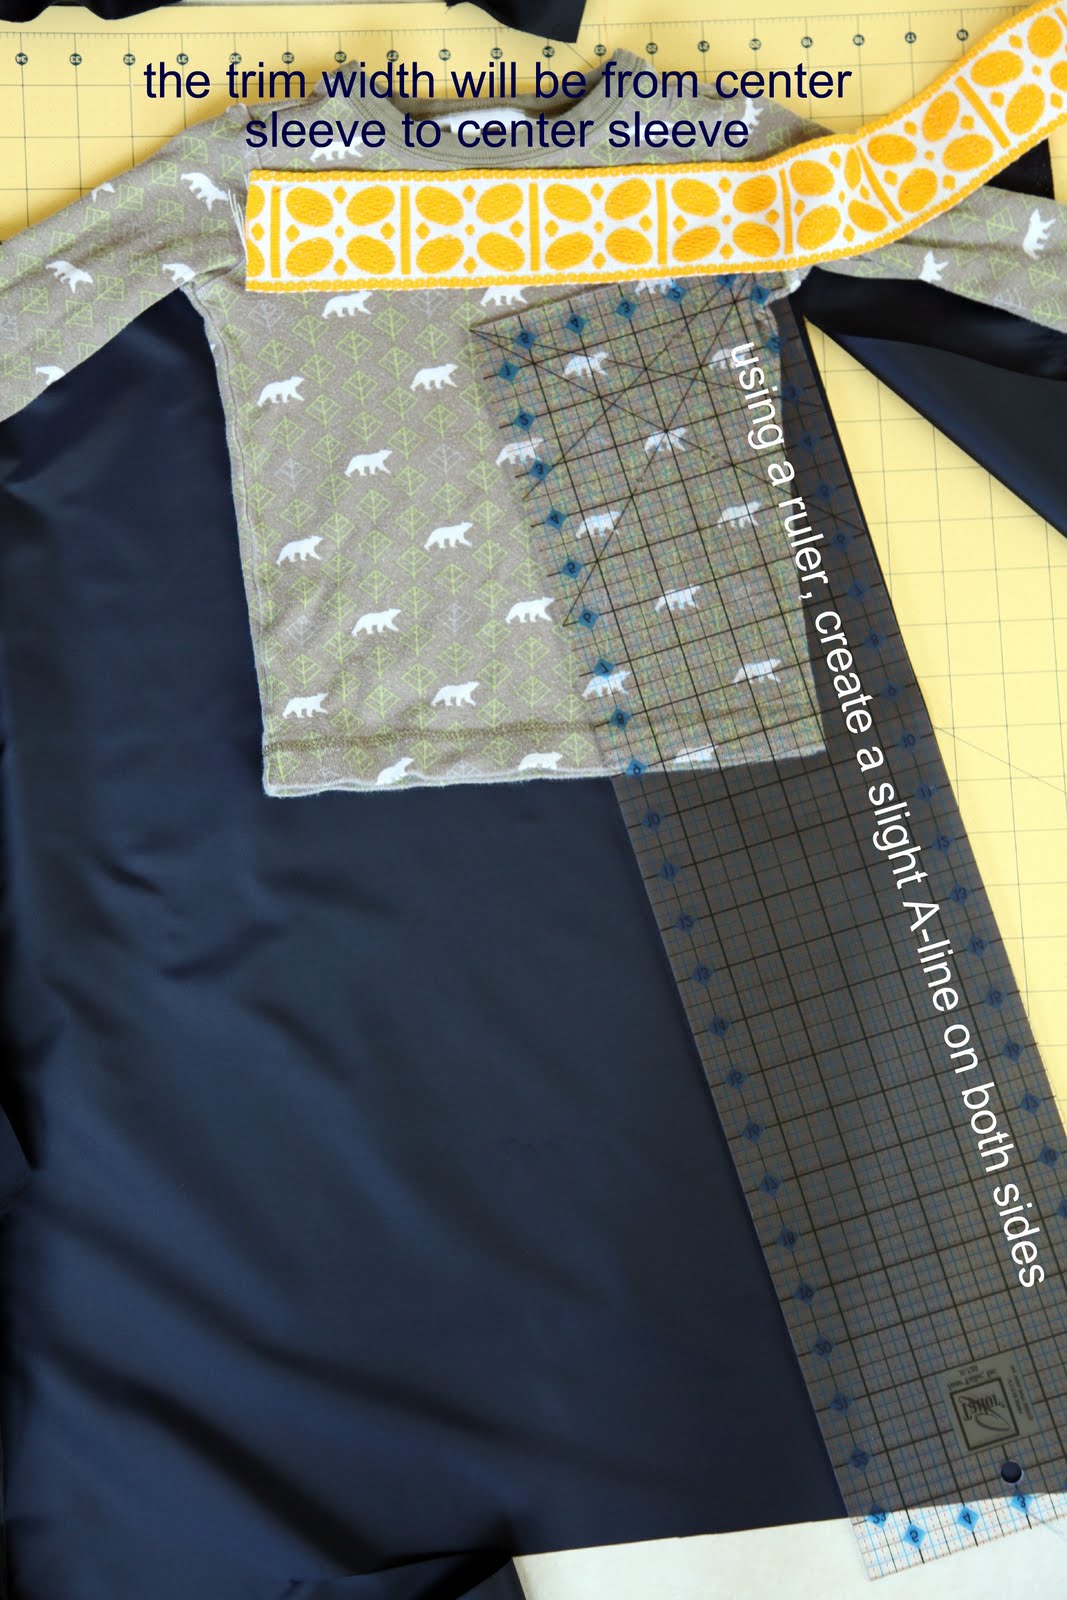
To create the base of the dress measure your child or your child's shirt from center sleeve to center sleeve. This will be the top of the back (or front depending on your preference). Cut it at a slight A-line using a ruler, to the length desired. Make sure to include seam allowances on all sides.
Cut the two front pieces in the same shape as the back piece folded, but adding an inch on the inner edge for the placket. Stitch side seams, right sides together and press.

Pin first row of ruffles to the top, clipping out a space for the arm holes. Stitch in place.

Using store bought double fold 1/2" bias, or your own (for a better match), open up bias and stitch to the front around armhole.

Fold bias back together and edge stitch along each side.

Using a fabric pencil or marker, measure lines 2 1/4" down from the top of the dress. This will put your next ruffle just under the first. Continue marking the remainder of the dress.

Pin the next ruffle on UPSIDE DOWN, matching the stitching line with your pencil/marker line. Stitch in place.

Flip your ruffle back down and edge stitch about 1/8", pulling the top up and the bottom down as you stitch.

Next cut your straps out by cutting a rectangle of 16" X 4" on the grain. Fold lengthwise and press. Fold raw edges toward the center crease and press, making sure edges line up. Cut piece in half for your two straps.

Position the trim without cutting the other side, pinning in place. Position straps, lining them up with the armholes. Fold trim around to the other side, making a sandwich with the straps in the middle. Cut trim and fold under raw edges. Stitch around the perimeter of the trim.

Finish the hem by turning under twice and stitching, making sure it doesn't show beneath the last row of ruffles. Baste down each side of dress to keep ruffles in place.

Cut two pieces of fabric 4" wide and 1" longer than the side of the dress. Fold and press as you did with the straps.

Unfold and pin the placket piece along the edge, with the top edges even and the placket extending at the bottom. Stitch a ONE inch seam. Fold once toward the back, the fold the extended end under and fold again, encompassing the placket entirely. Edge stitch along both sides of placket.

Apply the front trim the same as the back trim, make your button holes and you're finished!

Choosing buttons is one of my favorite parts of a project.


But, my other favorite part is big sisters who help get smiles from this little monkey.

Thanks, Kathleen! Your Free Pattern month has been so fun to follow.
It's been so much fun having you today Katy! Thank you again for participating with me. Love everything about you and your wonderful blog. Keep those eye popping outfits and photos coming!
Stay tuned tomorrow for Sarai of Colette Patterns!
Spread the word! It's a 30 day FREE for all!


 Like not spending money?
11 {comments}:
I love this dress! The yellow and blue together are adorable
HOw fun! I love this idea for a skirt as well! Thanks for putting all this together (the 30 days of free patterns)! You have great style! Thanks Kristy from www.apronsandapples.blogspot.com
Love this! Katy makes such beautiful things!
This is so adorable!!!! I love it! As per usual Katy is AMAZING!!! Her finishing and special touches always add that wow factor.
Her stuff is amazing! And not to nit-pick or take anything away from her talent, but the Village Frock is actually a design of the blog Sugar City Journal. I'm sure Katy would want credit given to them. Just a fan of both.
So beautiful!
Too cute!
So adorable!!
wow, it's bad when you start wishing you had children so you can justify sewing these gorgeous little outfits.... give me a few years perhaps, these are so precious!!!
This is really beautiful - I fancy making one to fit me as well as for my little girl!
Amazing! Her stuff is so amazing!!:D
Jonna xx
Post a Comment