


 Well here it is, by request of you, the poppy tutorial!!!! Like I mentioned before these were inspired by the Emersonmade poppies! If you rather not take the trouble to do these buy them here. All handmade and lovely.
I had wanted to complete these last week but I came down with an awful sinus infection which really took the wind out of my sails.
However, my good friend Cheila of What's Goin Down Episode invited me over to her new home on Friday which gave us the perfect opportunity to spend an afternoon taking pictures and making poppies. I love spending the day with Cheila. She's a great cook AND loves to sew!
They just bought a new older home and it's lovely! Full of all those touches you can't find in brand new construction. Moulding, moulding, moulding, hardwood floors, wraparound staircase, wood windows and pocket doors.
 Lily and her daughter had fun dirtying their playroom with play dough and moon sand. Less fun when it came time to clean up. We had fun eating chicken salad on endive, lemon pastries with coffee and of course....making poppies!
They are a little different than the first one I made (for the better). Less work. More pretty.
If you want a fuller flower just cut out more flowers and create more layers. If you want a smaller flower just eliminate the larger flowers and make fewer layers.
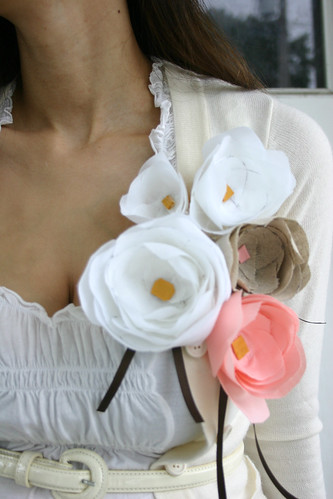
The giveaway is for the pea green poppy that is pictured on me at the top and the cluster of pink, white and beige poppies.
You might want also want to try cutting the tips of the flower patterns in a point to make peonies.
I might even suggest some embellishments like a hanging ribbon in the back. Or create several small ones of varying size and cluster them together to line one side of a vest or the neckline of a dress.
Here are some more ideas....here, here, here, or here.
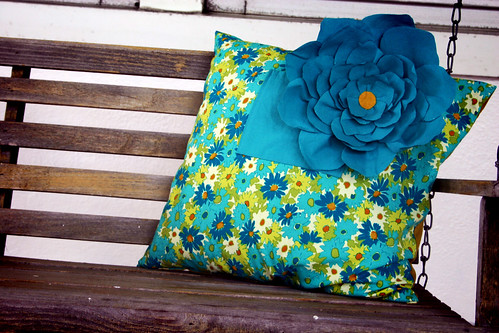
I made the above pea green poppy a little smaller than the original one on Lily. Cheila made thes full sized one in blue and had the brilliant idea to pin it to a pillow. It looked just like something in Anthropologie!
These flowers were an evolution of a pattern I found on Martha Stewart. She has some really FABULOUS paper flower tutorials. Check 'em out!
Materials:
1 yard of either Linen, Cotton or lightweight solid colored material
1-2 pin finding bars (I found mine at JoAnn fabric)
Fray Stop Spray (I found mine at Hancock fabric)
3"x3" felt
2"x2" piece of contrasting fabric for center
Thin tipped marker
iron
scissors
hot glue gun and glue
newspaper
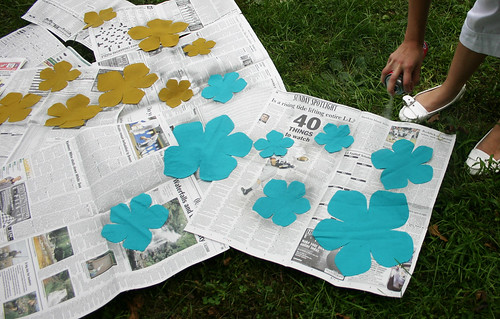
Step 1. Print these patterns (in PDF):
Large Flower Left, Large Flower Right (for these patterns you have to print on two separate pieces of 8.5x11 paper. Cut them out and tape them together.)
Medium Large Flower
Medium Small Flower
Small and Smallest Flowers

St
 ep
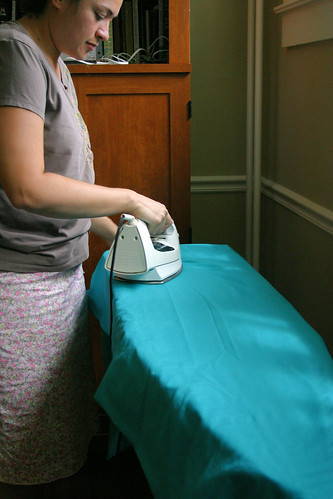
ep 2. Iron your fabric
Step 3: Double up your fabric and trace each of the patterns so that you have two of each flower.
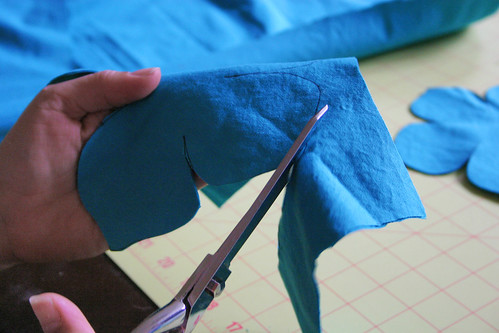
Step 4. Cut out the flowers.
Step 5. Spray your fabric with Fray Stop Spray on each side. I DEFINITELY recommend using a spray rather than a gel. It takes a FRACTION of the time. I bought mine at Hancock fabrics. But you can buy it online too. Surprisingly I could not find it at either JoAnn's or Michael's. You know, if you didn't have Fray Stop Spray perhaps some old fashioned hair spray might do the trick? After this step your flowers should be a little stiffer.
Step 6. Take the smallest flower and cut out each of the petals. Make each petal pointed at the bottom.

Step 7.
1. Once you have each petal cut....
2. Fold over the bottom half of the petal so that the petal cups up like a 'real' petal. I also recommend using the side that you did not trace on since a few of the marker edges can appear if you use that side up.
3. See how the fabric curves. The more you fold over the more curve you can achieve. If you wanted a look of a flower just barely opening you would make the petals almost fold inward on itself by making a very deep fold at the bottom. Experiment with this fold and see what you can achieve.
4. Hot glue the folded fabric in place. Do this for each of the petals.
5. Hot glue each of the petals together overlapping each until you use all the petals of the first smallest flower. It should look like a full circle of petals.
6. Do steps 1-6 for each flower hot gluing the next level of flowers underneath the previous level. See how it should look underneath in step 6.
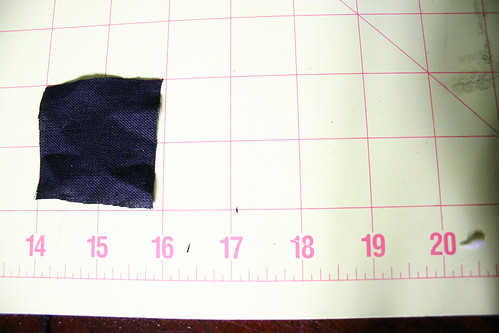 Step 8. Cut a 2"x2" piece of contrasting fabric for the center of the flower.
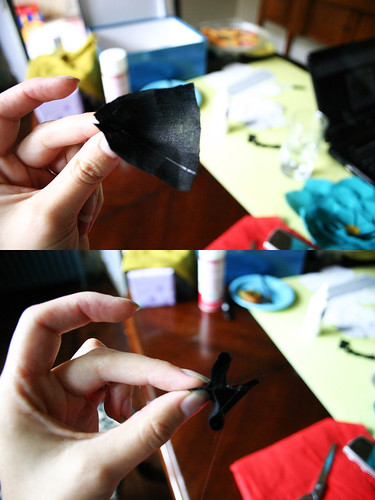
Step 9. Hot glue the ends together and then glue the middle together to form a 't' shape. Cut the top of the 't' off and put a dab of hot glue on it.
If this step is too confusing you could just cut a very small circle of felt and hot glue it to the center of your flower.
I preferred the method I used in step 9 because it had a puffier ball-like look.
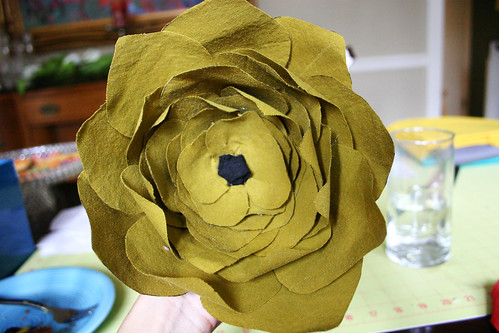
Step 10. Turn it over and press it into the middle of your flower trying to hide all the edges underneath the middle of the ball.
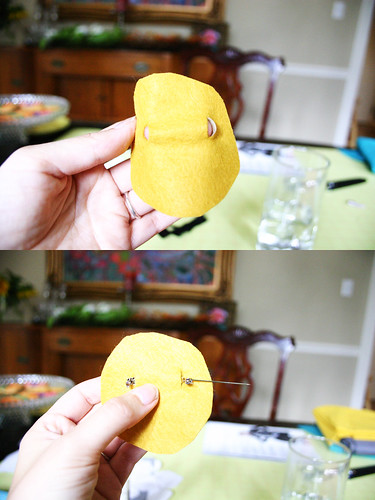
Step 11. Cut out a 3"x3" felt circle and make two slits near the top. Slide your pin through the two holes and hot glue it to the felt. Sometimes my flower droops a little when its pinned to my shirt so what you might want to do is try to either place the pin even higher on the circle or use two pins for extra support. Then take the circle and glue it to the back of your finished flower. VOILA! You're done.
As usual, if you would like a chance to win these poppies just link back to this post.
If you have any questions see the "questions and answers" link to the right. If you use blogger just use the "create a link" link at the bottom of this post. If you don't use blogger, that's fine too. Just create a link on your page as you normally would and I will see it using Technorati.
Create a Link
j.crew, j crew, jcrew, j.crew, j crew, jcrew, j.crew, j crew, jcrew, j.crew, j crew, jcrew, ann taylor, ann taylor loft, modcloth, express, gymboree, the children's place, gap, baby gap, old navy, the limited, crewcuts, garnet hill


 Like not spending money?
73 {comments}:
Beautiful! Love the pea green poppy..and the cluster too. Using them on pillows or even a bag are great ideas! thanks for the great tutorial and a chance to win one.
added a link on my sidebar.
xo
what a great tutorial! i'll have to try this out!
You look stunning! Congrats on the upcoming little one and what a lovely tutorial.
This poppy looks like the perfect fall accessory - and a great way to use smaller pieces of fabric. Thanks for posting! All I need is some spray starch and the pin, and this will be my next project. :-)
Hi! I am a new follower of your blog. The poppy boutonnieres are gorgeous! :) I am sure they make people happy when they see them.
I blogged about your tutorial and giveaway.
ist wonderfull!!
i`blog this here
http://hexchen-marie.blogspot.com/
greetings karin
hi! i just found your blog through the "happy together" blog! wow! i love these sweet poppys! i have been seeing them around blogland and cant wait to wear one! i will try to make one with your tutorial but hopefully i will win yours! ha! i just started a blog and i thought i would try to post about this! cant wait to read more! thanks!
julie@jam-n-jilly.blogspot.com
Your flowers are gorgeous! How do I enter the giveaway? I would love to win the ones that are pinned to your white cardigan.
i'm all about the hot glue!! haha thanks for sharing this!!
Beautiful! You are absolutely glowing mama! Congratulations!
I just got a pretty new black cardigan this would look gorgeous on!!! I may have to try my own!! Thank you!!!
Just found your lovely blog and I am in love with these Poppy Boutonnieres...how much fun...thank you for sharing ...I am going to give them a try! I am off to follow your lovely blog and to see what I have been missing!
Adorable. I linked to this post. Please count me in the giveaway!
letseatdessert.blogspot.com
Paige
beautiful! I can't wait to make one but winning it would be even better.
awesome! so may ideas and possibilities! escpecially with the upcoming holiday season!! NIce..thnks..added a link in my post!:)
Love these!! Wish I had the patience to make them!!
Adorable baby bump!!! Love the tutorial, too!
Thank you, thank you, thank you!!! This is a great tutorial, I just have to go buy the fray spray and I am going to get started making beautiful poppies.
These are so pretty! Do you think spray starch would work to stiffen the fabric? (though it probably wouldn't prevent the edges from fraying)
Wonderful! Thank you!
While I hope to make some soon, winning would be grand!
I love the tutorial, will have to try it!
It is on my favourites to be done! how exciting! Thanks for sharing!!!
http://sugarrosies.blogspot.com/2009/09/poppy-boutonniere-tutorial-and-giveaway.html
shou.milk@gmail.com
love them!
oooooooooo! the tute turned out great! nice job my friend and thanks for all the props on your bloggy.
So pretty. These remind me of my poppy pins, but still unique in their own way. I love how our creative goodness is in such work! Linked to my blog.
So pretty!
What a beautiful and simple adornment. I am so in love with this project. I think I'll have to make a few for Christmas gifts. They'd even look lovely as a functional replacement to a bow on a box. Thanks so much for the tutorial.
Just found your blog and looove it! I'm making some of these poppies RED for GAMEDAY in the south!
Gorgeous! I love this idea!
I couldn't resist adding this to our link luv roundup today. Come by for a peek:
http://www.luvinthemommyhood.com/2009/09/link-luv-roundup_09.html
Thanks for another great tutorial!
this was added to my "HAVE TO TRY" list. so great!
These are SO perfect for fall! I'll definitely have to make myself one! Your tutorial makes it look so doable!
Saw this on Craftzine and just love it! These are really beautiful and I'm happy to have discovered your site.
Amazing and inspiring. Nice work!!!
What a wonderful tutorial. I definitely see some of these in my future!
Rosemary, OH
love this idea! This would look so nice on my new purse.
These poppies are so cute! Great giveaway!
very very beautiful flower! :)
How stunning! I'm new to craftiness, but the elegant simplicity of the project, great tutorial, and my overwhelming desire to have one of these has convinced me that this MUST be my next project! Thank you for the beautiful inspiration!
The poppies are beautiful - I really like the pillow idea! I'll link this on my blog also.
Awesome tut! I can't wait to make one!
I'm going to get the supplies to make one today! I'm so excited!
i love these! thanks for the great tutorial. all the photos are super helpful. can't wait to try making these!
sonia
Whoa! WAY gorgeous! I can't wait to make one...or five. I'll be linking too.
so beautiful, I have a purse that would look amazing with one!
beautiful!
How do i leave a link?
http://oneamongsisters.blogspot.com/2009/09/poppy-boutonniere-tutorial-and-giveaway.html
I almost fell off my chair when the Poppy pictures popped up. (Say that real fast three times... lol) Anyway, that's because I LOVE Poppies, I have them planted right outside my window where I can see them from my favorite chair. Their little faces smile and greet me each day. You have done such a beautiful job making them and what an honor it would be to show them off. Thanks so very much for this opportunity. :}
You always have such great pictures. I think it would be interesting to fuse two peices of fabric together. The inside and outside of the flower could be two colors and it would seal the edges at the same time.
I love this tutorial and included it in my Tutesday roundup on my blog at http://www.lisaashby.com. :)
Lisa
Great tutorial! I posted a link on my blog http://yellowfinchdesigns.blogspot.com and twittered about it.
Thanks!
Elizabeth
These are beautiful and look like so much work! I love the pics of you and am so glad to have found your blog :).
I linked you to my blog! I just absolutely ♥ those!! Just a Q, do the outfits come with the flowers? :) The Cluster is AMAZING!!
I love how full and romantic your flowers are! Thanks for the tutorial.
I need to know where I can find the red dress pictured with the Brown flower/poppy....or pattern? I absolutely LOVE it! and the flowers as well, great tutorial, thanks
Thank you for the tutorial and for the chance at winning one of your beautiful poppies!
Michelle
i loved the tutorial
thanks!
and i blogged about the giveaway
thanks!
http://theadventuresofroryandjess.blogspot.com/2009/09/poppy-boutonniere-tutorial-and-giveaway.html
hope to win!
I feel that this site could be very useful & informative. Looking forward to more stuff.
I LOVE, LOVE, LOVE this. Thank you for the clear instructions! I am going to make this on the weekend!
amazing one..
it is really wonderful and great tutorial also.
i like this post so much.
keep sharing such a nice post with us.
all the best.
I love these Poppies. I will for sure be making these. I posted this on my blog and created a link. Thanks for the tutorial.
These are like the ones on Emersonmade. Love them!
is there anything besides the fray stop spray you can use? I'm not living in the us and can't get it anywhere here...
Love the Poppy, really gels nicely.
the finishing touch is sooooo beautiful!
Love from florist :)
Hi! You've been featured HERE http://wp.me/p1hRux-2x
Really good
<a href="http://www.onlineGiftDeals.com>Send Eid Gifts to Pakistan</a>
Can someone fix the links to the various sized flower patterns please? It take me to a gaming site
Did anyone get to fix those links? I'd really like to make this flower.
thanks
@hull.amieI wrote an update with link to pattern here:
http://grosgrainfabulous.blogspot.com/2012/03/poppy-boutonniere-pattern-pdf.html
Im trying to find the cut out patters for the flower but the link does not work. Is there another place I can find these at?
I like the patterns and colors of your art. The way you explain you creativity is amazing.
Send Eid Gifts to Pakistan
Thanks for sharing this useful information! Hope that you will continue with the kind of stuff you are doing.
Learn Quran Online
@liz stanley
Yes you should try this. Taxi Liverpool
beautiful idea! compliments!
Post a Comment