skip to main |
skip to sidebar
 I know I had mentioned that I would be posting the owl and pussy cat masks yesterday but I've come down with some awful sore throat sinus thing and like most sicknesses it has brought me to a stand still.
In the meantime, I'd like to introduce you to My April Snow.

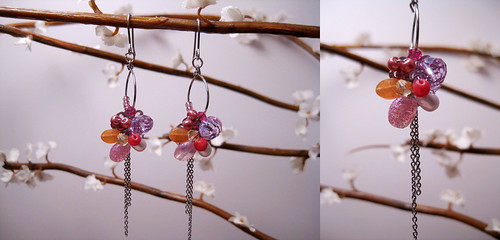
She is giving away the earrings above and to the left to two lucky Grosgrain readers. Both are made from natural gemstones and swarovski crystals (for coral combo only) with silver findings.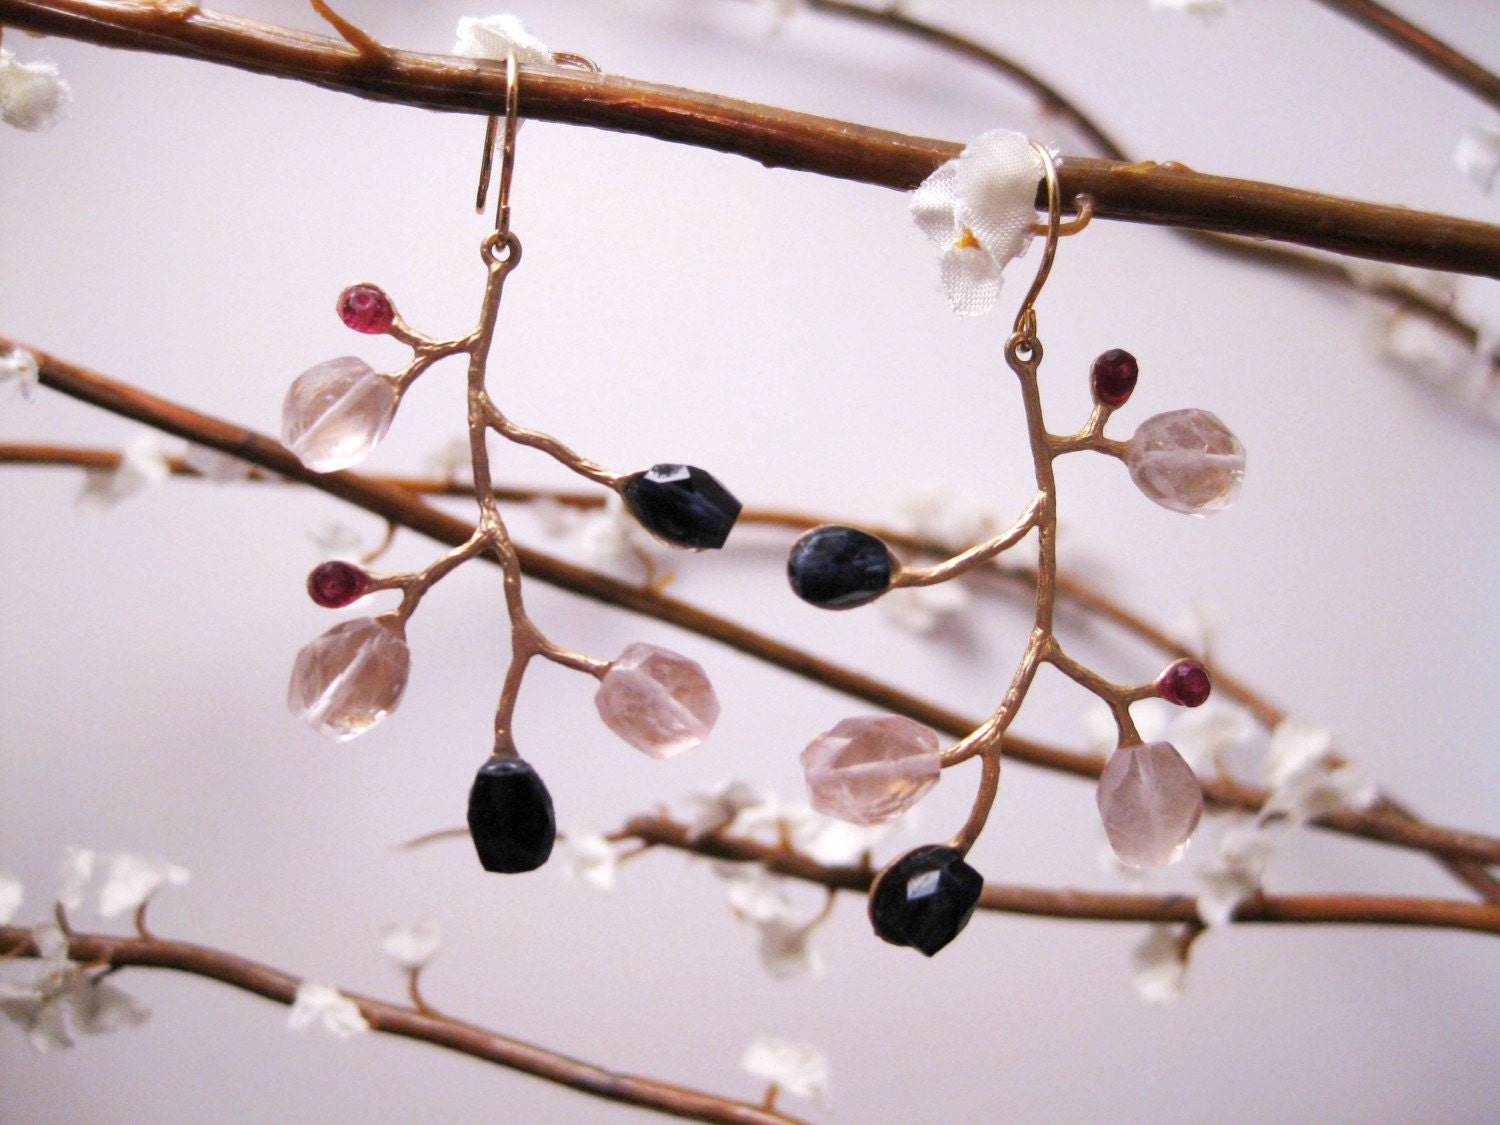
My favorite were these elegant Trio Combination of Blueberry Quartz, Pink Quartz Peridot and Garnet Swarovski Crystals on matte gold vine and ear hooks. Earrings are 2 " in length.
After twelve years in the fashion industry as a designer and merchant of women's clothing, April decided to use her natural talents and creativity into creating her own line of jewelry. Check out her online store for her handmade jewelry (mainly earrings and headbands).
As usual, if you would like a chance to win one of these earrings just link back to this post.
If you have any questions see the "questions and answers" link to the right. If you use blogger just use the "create a link" link at the bottom of this post. If you don't use blogger, that's fine too. Just create a link on your page as you normally would and I will see it using Technorati.
Create a Linkj.crew, j crew, jcrew, ann taylor, ann taylor loft, modcloth, express, gymboree, the children's place, gap, baby gap, old navy, the limited, crewcuts, gap the children's place, gap, baby gap, old navy, the limite
 Here's a little taste of Halloween in September. I want to post my first 'official' Halloween giveaway on October 1st but I have my doubts that I will make that goal. I'm really throwing everything but the kitchen sink into the giveaway. So, in the meantime, please enjoy some Carnevalesque goodness.
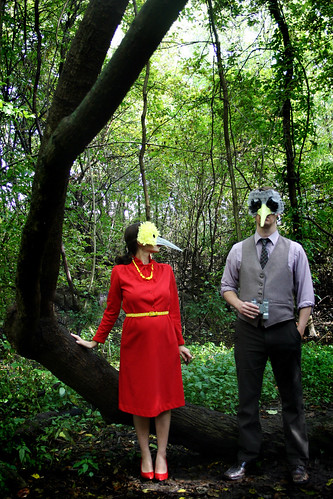
When I saw these masks in the latest Martha Stewart magazine along with a DIY tutorial I knew I HAD to try them. If you like them too, check out the tutorial here.
These make a great 'adult' costume. I liked the formal attire combined with the 'masquerade' look of the masks.
Here are some tips if you decide to try to make them yourself.
DON'T skimp on the materials. You absolutely need crepe paper in the sheet form and NOT the streamer form especially for the beak.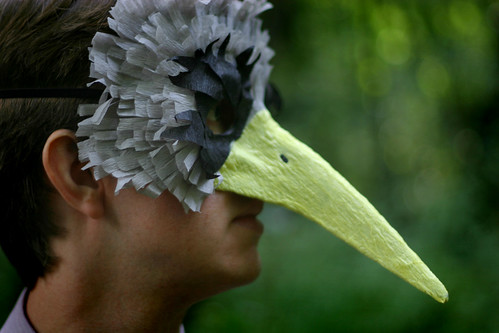 DO use a glue stick and not a glue gun. You really need the wide application of a glue stick. But more importantly you need time to carefully arrange the crepe paper and a glue gun gives you very little time to make mistakes.
DO NOT start the feathers around the eyes first like it says in the tutorial. Rather start around the outer edge of the mask. This way you can easily layer them on top of each other rather than having to pull the feathers up to glue the next layer underneath. If this is confusing to you, follow the tutorial until you reach the step in which you must start to glue the feathers. You will see what I mean.
DO buy your crepe paper online. I used half a tank of gas searching for gray crepe paper. And I was lucky to finally find it in streamer form. I would have saved myself a lot of time and money by just buying them online. Since you have to buy the blank paper mache masks online you might as well go ahead and buy the paper.
DON'T substitute tissue paper for crepe paper. The reason why crepe paper works so well is because of the wrinkles. It lends itself well to the look of feathers and gives a 'creepy' sort of texture that compliments a 'carnevale' style mask.
DO experiment with different colors. If I were to do these again I would have done a red and black feathered bird. Or a plain black raven with a yellow beak.
DO buy broad scalloped scissors. This will save you a lot of time especially if you do not have the steady hand to make even bumps yourself. You can find links to everything in the above mentioned tutorial except for the scissors. I found those at Michaels for $1.99.
I found the retro red dress at the Salvation Army for $1.50. I think it's really slimming and hides my pregnancy.
You may not be able to tell from the photos but I cut off the elastic band that came with the masks and added two thin velvet ribbons which work really well! This way they are adjustable for anyone and look a lot more slick!
It rained all yesterday and all morning today. It's supposed to rain tomorrow, Tuesday and Wednesday. We found a small window of sunlight between 3pm and 5pm and drove out to the wildlife preserve.
I really should have rethought my shoe selection. The ground was pretty gross and my stiletto heels sunk in like sand. Plus, wearing high heels when your 22 weeks pregnant is NEVER a good idea. I nearly fell over several times. Compared to all the other hikers I looked pretty insane.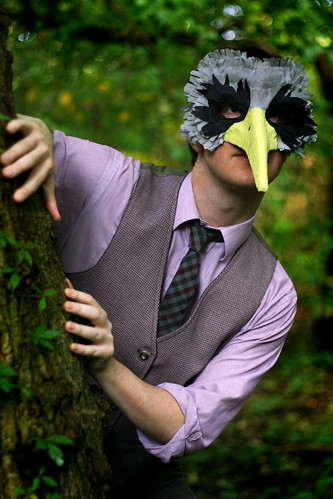
By the end of our photo shoot I was feeling uninspired but I wanted to get one more shot. I asked Brian to do something silly for me. He answered, "Sillier than walking around the woods in a suit and tie with bird masks on?"I think the best part of this shoot for me was not having to put on any make up except my red lipstick. And simply pulling back my hair in a ponytail. I was ready in about 2 minutes.
If you look at the Martha Stewart shoot you'll see that there are two smaller masks for children. No, I didn't forget about them! LOOK FOR THE OWL AND THE PUSSYCAT MASKS ON TUESDAY.
This giveaway is for the masks featured in this post and I would would say these masks will fit any adult.If you have any questions see the "questions and answers" link to the right. If you use blogger just use the "create a link" link at the bottom of this post. If you don't use blogger, that's fine too. Just create a link on your page as you normally would and I will see it using Technorati.
j.crew, j crew, jcrew, ann taylor, ann taylor loft, modcloth, express, gymboree, the children's place, gap, baby gap, old navy, the limited, crewcuts, gap the children's place, gap, baby gap, old navy, the limite
 I love fabrics that POP when you put them together. They have the ability to turn a plain white tee shirt and jeans into an outfit. The Pleated Poppy (I love that name!) is one of those shops that offers those little baubles that completes an outfit.
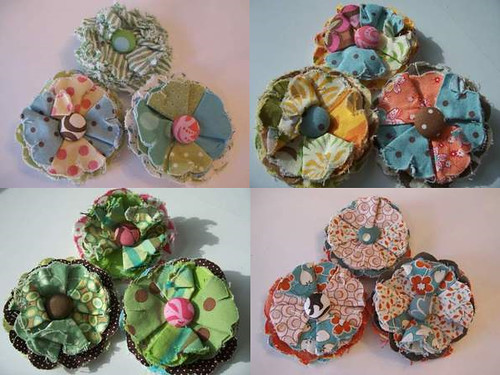
Lindsey Cheney, owner of The Pleated Poppy. Is offering Grosgrain readers the chance to win a checkbook cover and set of posy pins from her online store.

These sets of posy pins are handmade and unique, made with 2 to 6 different fabrics, topped by a covered button and finished off in the back with a silver one inch bar pin. They look great on a shirt, pinned to a bag, as a gift topper... be creative!
With these adorable checkbook cover, paying bills seams a bit more, umm, enjoyable? There are 2 pockets - one for your checkbook and another for a register or maybe receipts.
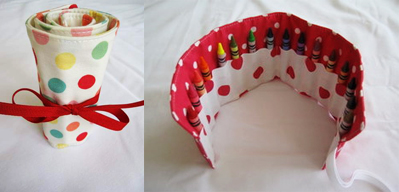
My personal favorite is this crayon roll. It comes with 16 crayola crayons. It is small and compact and great for the car or restaurant. It ties closed with a coordinating ribbon.
But I also love these four covered notebooks each have a removable cover. The cover can be refilled with a standard size composition notebook.
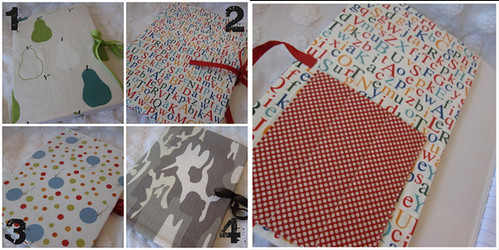
Each notebook cover comes with a composition notebook, a ribbon tie closure, and an inside pocket to hold 3 pens/pencils. Great for school, doodling, and list making!
Lindsey spends her days as a stay-at-home mom of three, 5 and under.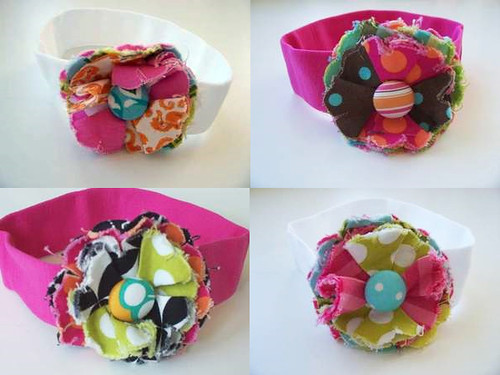
She homeschools her first grader and 3 year old 3 days a week. So up to her insanity level she started a crafty business out of her home, so she could contribute financially for her family and still be with my kids....and have a better excuse to craft more often!
She makes lots of different items, from fabric flower brooches to superhero capes, crayon rolls to zippered pouches.... lots of items great for gifting or treating yourself.

As usual, if you would like a chance to win this this checkbook cover and set of posy pins just link back to this post.
If you have any questions see the "questions and answers" link to the right. If you use blogger just use the "create a link" link at the bottom of this post. If you don't use blogger, that's fine too. Just create a link on your page as you normally would and I will see it using Technorati.
Create a Link
j.crew, j crew, jcrew, j.crew, j crew, jcrew, j.crew, j crew, jcrew, j.crew, j crew, jcrew, ann taylor, ann taylor loft, modcloth, express, gymboree, the children's place, gap, baby gap, old navy, the limited, crewcuts, gap the children's place, gap, baby gap, old navy, the limited,
 Grosgrain would like to introduce Lisa Leonard Designs. Lisa creates lovely and sentimental custom jewelry for mothers and wives, husbands and fathers, daughters and sons.
She has been kind enough to offer TWO $50 gift certificates to TWO separate Grosgrain readers!
Lisa work has been featured in many mainstream magazines such as American Baby, Wondertime, Pregnancy, and Cookie, among others.
She has been making jewelry since high school but decided to get serious after her first son, David, was born. She wanted to start a small business that would enable her to quit her job and stay home with her boys. At the time, she had never taken any formal classes or received special training in jewelry making. She just went for it! She's the kind of the 'jump in and learn as you go' type. Creating jewelry not only allowed her to work from home, but has connected her with so many amazing women along the way.
Her desire is to create simple, lovely pieces that can be worn with jeans or your little black dress. She wants each piece to be meaningful. Her custom jewelry is hand-stamped with your kids’ names or a special phrase or verse. She loves to touch her necklace throughout the day and reflect on her husband and her sweet boys.
These customized spoons are my favorite piece. I imagine my kids sitting at the breakfast table each happily eating with their own personalized spoon:)
Each piece she creates is a work of art—hand cut, hammered, polished, drilled and assembled with care.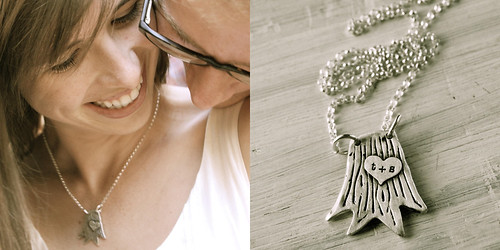
She is inspired by other artists--painters, scrapbookers, clothing designers and poets. She also loves to soak up nature-the sky, the sea, the green hills. She lets all these ideas and images swirl around in her mind and then she creates. When an idea hits her, she sketchs it out and plays until the perfect design comes together.
Lisa Leonard Designs exists because moms, grandmas and friends have shared their designs with each other while waiting in line at the grocery store or sipping coffee with a friend. Most of her customers find her through word of mouth. She knows that you’ll find the perfect piece.
Come visit her blog to hear more of her story and please share your story with her!
As usual, if you would like a chance to win this one of these gift certificates just link back to this post.
If you have any questions see the "questions and answers" link to the right.
If you use blogger just use the "create a link" link at the bottom of this post. If you don't use blogger, that's fine too. Just create a link on your page as you normally would and I will see it using Technorati.
Create a Link
j.crew, j crew, jcrew, j.crew, j crew, jcrew, j.crew, j crew, jcrew, j.crew, j crew, jcrew, ann taylor, ann taylor loft, modcloth, express, gymboree, the children's place, gap, baby gap, old navy, the limited, crewcuts, gap the children's place, gap, baby gap, old navy, the limited, crewcuts, ga
 I know I mentioned her before but I really would like to introduce you to an AMAZING photographer, Nicole Hill Gerulat. She is the talented hand behind A Little Sussy, a blog I've been following religiously for close to two years.
I don't think it's any secret that I have an interest for photography. I try to put as much effort as I can into the photos I post on this blog. But did you know that the outcome of my photos are about 50% camera / 50% Photoshop. Not the dumbed downed versions but the actual Photoshop. I didn't even have an SLR for the first year I posted on Grosgrain. 
If you know your way around PS, you can take a photo with a 1.3 MP camera phone and end up with something worthy to hang on your wall!Take a look at this completely artificial world I created with a few tips and tricks in Photoshop. Imagine the possibilities when you combine PS with other Adobe programs like Illustrator and InDesign. You can stop paying someone to make your own headers and make your own! I used Illustrator when making my TumTum Tree blog header.
Nicole and a few of her talented friends are offering some VERY useful classes to all you bloggers (and non-bloggers:) out there for a very affordable price in locations that may be close to you.
Mini Art Weekend in DC: OCt 2-3
Mini Art Weekend in NYC: Oct 9-10
Art Weekend in SLC: Nov 5-7
Classes offered: Photography, Photoshop, InDesign, Illustrator and more! (In the SLC Art Weekend they offer Bookbinding, Selling on Etsy, Blogging, Papercutting, Screenprinting, etc.)

See here for more details and sign up.
Cost:
All classes (except photography): $50 eachPhotography Crash Course: $200
Sign-ups:
Click here to sign up.
For a layout of the class schedule, click below to enlarge:
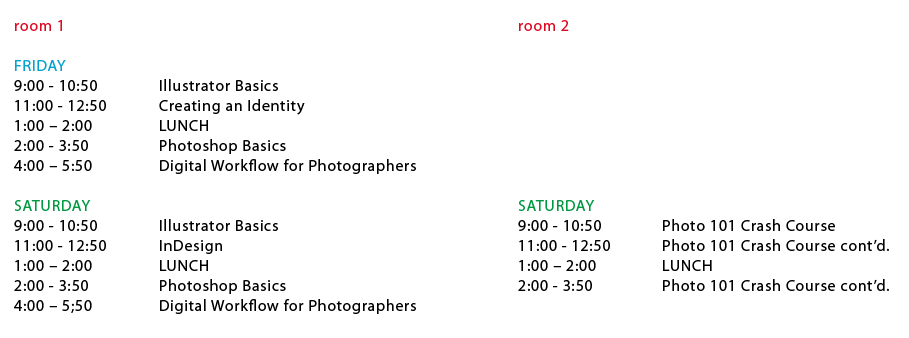.png)
 ALSO, keep your eyes out for nicoleclasses.com launching online in January featuring classes in Photography, Photoshop and Illustrator.
Fortunately for me, I've learned these programs in college and in my work. They are not as difficult to learn as you may believe. Once you have the hang of the way Adobe programs run, it's very easy to learn them all.
That being said, I've never taken a photography class and I have ALWAYS wished to participate in one. I majored in journalism and had many opportunities to take photojournalism classes, but for one reason or another (mostly money) I never took one and have ALWAYS regretted it. Finally, I'll be taking the extra step and attending the Photography 101 class in DC. Maybe I'll see you there!
See course descriptions below.
All above photos courtesy of Nicole Hill Gerulat.
Learn Photoshop's most useful tools and become familiar with the workspace. Use Photoshop to enhance your photos by improving color and contrast. Learn about layer masking and actions. Laptop with Photoshop CS4 installed required. (Free trial download available at adobe.com. Please do not download until the night before class.) Taught byMike Loveland. This class is offered Friday, October 9th, from 2:00pm - 3:50pm or Saturday, October 10th, from 2:00pm - 3:50pm. Click here to sign up.Use Camera RAW, an industry-preferred way to enhance your photos and manipulate your images without damaging the original file. Images will be provided. Laptop with Photoshop CS4 installed required. (Free trial download available at adobe.com. Please do not download until the week before class.) This is a great class to take after Photoshop Basics and Photo 101 Crash Course. Taught by Mike Loveland. This class is offered Friday, October 9th, from 4:00pm - 5:50pm or Saturday, October 10th, from 4:00pm - 5:50pm. Click here to sign up.Learn the basics of Illustrator to get you on your way to creating logos, graphics, and vector illustrations. Don't know what vector is? That's a very good reason to take this course. Laptop with Illustrator CS4 installed required. (Free trial download available at adobe.com.Please do not download until one week before class.) Taught by Alma Loveland. This class is offered Friday, October 9th, from 9:00am - 10:50am or Saturday, October 10th, from 9:00am - 10:50am.Click here to sign up.
Learn how to create graphics unique to you or your client. We'll cover the basics of logos, blog headers, and web buttons. An ideal class for up and coming entrepreneurs. Laptop with Illustrator CS4 installed required. (Free trial download available at adobe.com. Please do not download until one week before class.) It is recommended to take this class after Illustrator Basics. Taught by Alma Loveland. This class is offered Friday, October 9th, from 11:00am - 1:00pm. Click here to sign up.InDesign is the best program to use for books, brochures, and newsletters. Learn to create templates in InDesign to keep the look of your publications consistent. We'll work on a cookbook spread together in class. No previous experience with InDesign required. Laptop with InDesign CS4 installed required. (Free trial download available atadobe.com. Please do not download until one week before class.) Taught by Alma Loveland. This class is offered Saturday, October 10th from 11:00am - 1:00pm. Click here to sign up.
Check out these
Trendy Maternity Clothes !
 When I had my first daughter, Lily, I wore the ugliest, baggiest, frostiest maternity pants and I wore them happily because they were all I knew. I still have them....upstairs....on the hanger....never to be seen again. Next stop, consignment sale.
When I had my second daughter, Molly, I wore a few more reasonable if not slightly baggy-in-the-butt jeans but they were VERY tight around the waist, especially in the third trimester. I'm not quite sure why, I'm really not that big.
Now that I'm 20 weeks pregnant with....(insert forthcoming name here) I've come to the awful realization that comfortable, good fitting maternity pants are for the affluent and prosperous- those who can afford to spend $75 or so on a new pair. Let's just say I'm about.....$70 or so dollars shy of that number.
I said to myself NO! Not another unflattering nine months of pregnancy. If I have to be hunched over a toilet while massaging my aching temples at least I can look smart and snappy while doing it.
So I drove to my old stoppin' grounds, also referred to as the local Salvation Army and bought a couple jeans to take home and perform sewing surgery.
A few tips, if you are also in my tightly fitting shoes, go to the Salvation Army on Wednesdays, everything except the inventory that came in the night before is half off! Go every week and eventually you'll find things you like. Get a Goodwill Shop'n'Save card. It costs less than $5, lasts for a year, and will probably pay for itself on your first purchase. Goodwill gets inventory that Target doesn't sell so you can get a lot of brand new, never worn clothing for a VERY good price. Also, not all Goodwills have the same prices. Some are A LOT cheaper than others. So if one store is charging $7 for a Liz Lange maternity top, try another Goodwill in the area. It should only cost $1-$3.
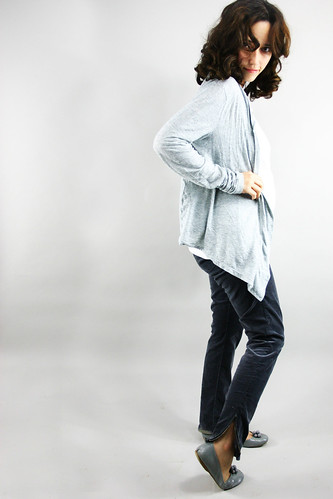
This was the result. The first and last pair I actually bought at Forever 21 for $7.99 and $12.99. They are 'skinny' jeans and before you say "NO WAY, skinny jeans and pregnancy DO NOT mix". I say, "Wait, give them a try". What do you have to lose? $8? Three sizes of extra material in your tush?
I've bought ALL of my maternity wardrobe at thrift stores this time around and I'm proud to say I haven't patroned Motherhood Maternity once. I haven't paid over $7 for a stitch and the majority of pieces I've bought were only $1-$3.
The best part about these pants are that they are COMFORTABLE since no elastic is involved. And now that I have a little bit of baby bump they stay on with no problem. And of course, they aren't saggy in my butt. As an already short person I don't need anything de-emphasizing my legs.
And in my opinion, they are quite easy. I know, I know, if you're just a beginner they AREN'T that easy. In all honesty, on a scale of 1 to 10, I would say this project has a difficulty level of 4.
When you're finished you'll have a great fitting, easy-on-the-wallet, easy-on-the-waist, pair of maternity pants that you can brag to your friends about.
In all I'd say this project takes me about 20 minutes.
Materials:
Pants
Knit Fabric (that closely matches pants) 8"x45" or 12"x45"
Felt tipped marker
Scissors
Straight Pins
Sewing Machine
Step 1. Find a pair of pants that you won't feel bad about ruining. I bought these at a Salvation Army for $2. Try them on and be sure they can be pulled up around your waist but NOT buttoned. This is important. At the end of my last pregnancy, to my horrid surprise, I couldn't even pull any of my jeans up to my waist let alone button them....and that was AFTER I had the baby.
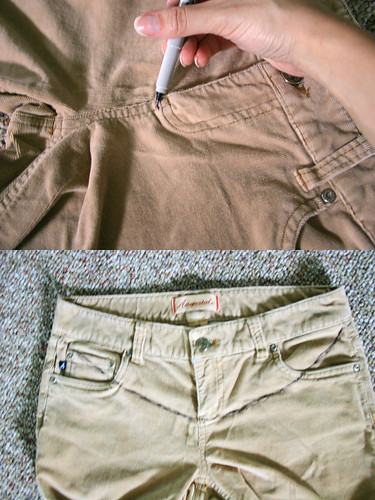 Step 2. With a felt tipped marker or disappearing ink marker draw your cutting line around the waist. Start just below the zipper and curve up to the bottom of the belt loops at each side of the waist. See right pic for example. In the back continue your line just below the belt loops.
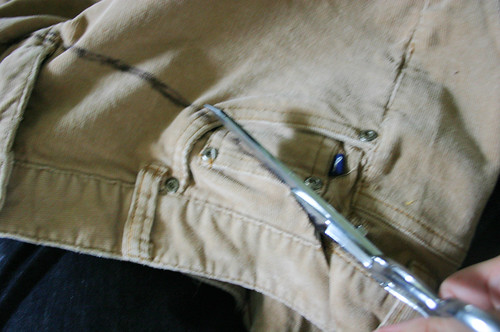 Step 3. Cut along the line. Don't worry about the pockets just cut right through everything. If it makes it easier for you, try placing a few straight pins in the pockets to keep them from coming apart later.
Also, try to cut off any metal that could get into the way of the sewing machine. For instance, in the photo to the left I cut the metal divots out. If the cut goes below the line it's really no big deal.
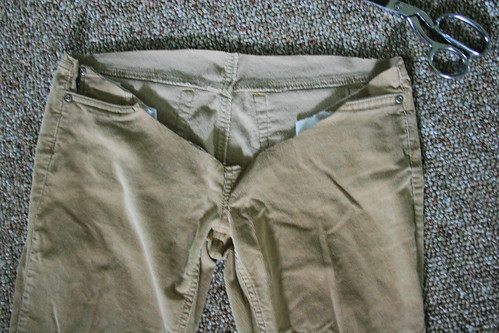
Step 4. This is how your finished cut should look.
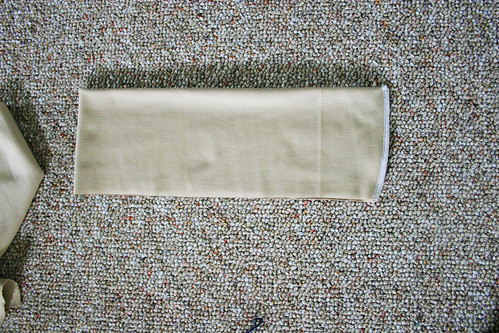
 Step 5. Take your knit fabric. Cut a 8"x45" piece and fold it in half. OKAY, HERE'S SOMETHING REALLY IMPORTANT. Remember to cut the fabric so that the stretch of the knit is width (left to right) and NOT length (up to down). Otherwise you won't have any stretch in your band, thus defeating the purpose of maternity pants, right?!
Here's another good tip, the earlier you are in your pregnancy the skinnier the waist band should be.
0-4 months= 8"
5-and up= 12"
 Step 6. Take the folded band and stretch it around your belly. If you are further along you don't have to pull as hard to stretch the fabric. But still make it stretch a little. If you are less than four months along pull the fabric as tight as you can. Then cut the fabric leaving about 5/8" for seams.
I held my fabric a little too high in this picture which caused the band to be too tight later. It should be held just under your belly, the way it will fall when you are wearing them.
 Step 7. Sew the two ends together. This is how it should look when you are done.
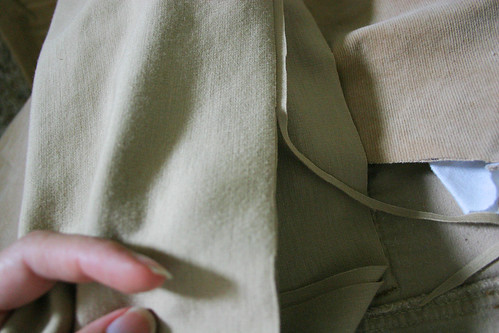 Step 8. Cut off any extra fabric that doesn't line up at the bottom. The bottom of your band needs to be exactly lined up. Otherwise when you sew the band to your pants you could sew one side and miss the other.
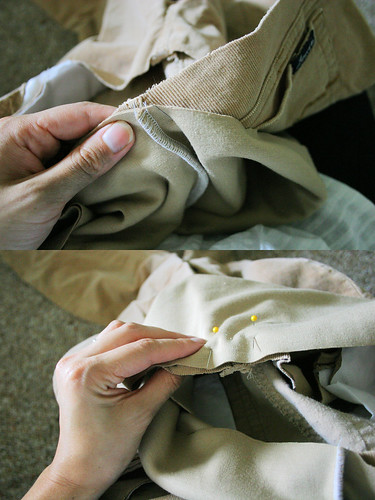 Step 9. Pin the band to your pants. This is probably the hardest part of the project because the band will be smaller than the opening of your pants. You'll have to stretch the band a bit.
Here's a good way to start. Slip the band over the pants so it is on the outside and the bunched up pants are on the inside. Keep the right sides together when doing this and match the cut side of the band to the cut pant. Pin the seam of the band to the back of the pants. Then find the opposite side of the band and pin that to the front of the pants. Then takes the sides and pin them so that you now have four pins in four sides and stretch the band in between the pins to fit the opening of the pants.
Remember that when you pin the band to the pants that you pin the right sides together.
 Step 10. This is how the pinned band should look.
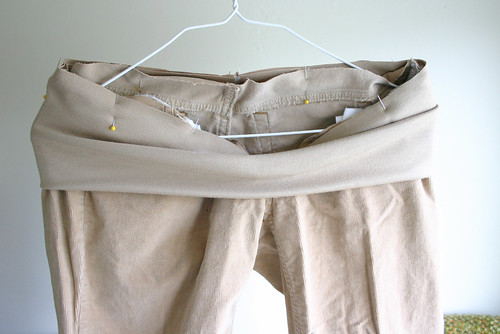
 Step 11. Sew the band to the pants. The finished seam should look like this. Remove the pins.

Step 12. Voila! Pull the band up and there is the finished pant. Surprise, it's the one pictured in the second photo at the top of the page. Good enough to slip on right now! Comfy as sweat pants:) Enjoy!
Create a Linkj
j.crew, j crew, jcrew, j.crew, j crew, jcrew, j.crew, j crew, jcrew, j.crew, j crew, jcrew, ann taylor, ann taylor loft, modcloth, express, gymboree, the children's place, gap, baby gap, old navy, the limited, crewcuts, garnet hill


 Like not spending money?